Category Archives: January 2012 - Page 3

11th January – Cottage pie

Today I was cooking for a friend and so could do a bigger meal (I’m normally just cooking for myself and then having the leftovers for lunch the next day!). I decided to try a cottage pie as I’d never done one before.

Ingredients

• 1 tbsp oil
• 1 large onion chopped
• 2 medium carrots, chopped
• 560g/1¼ lb beef mince
• 400g/14oz can tomatoes
• Frozen peas
• Thyme
• 2 tbsp tomato purée
• Salt and freshly ground black pepper
• 1kg potatoes
• Butter
• Milk

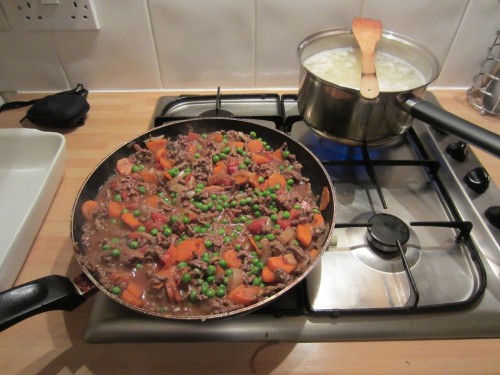
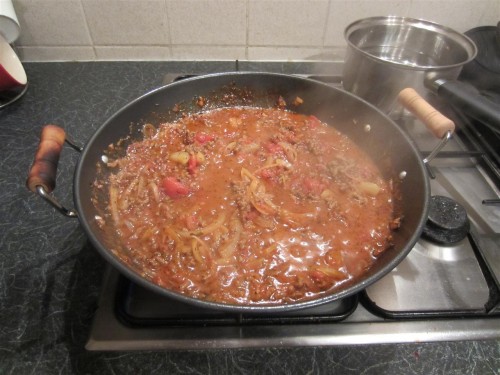
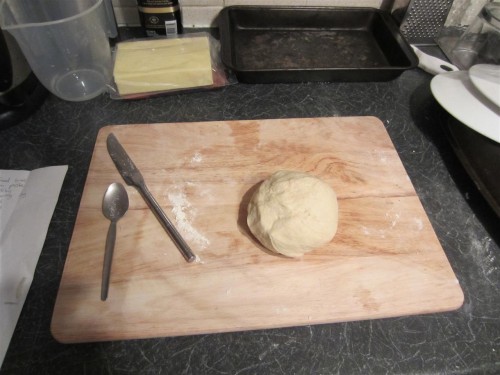
Put the oven on at 190 degrees C or gas mark 5 whilst you do the prep. Chop up the potatoes into cubes for quicker cooking and easier mashing. Heat a large pan up and add a little oil followed by the onions and carrots and cook for 3-5 minutes until softened. Then add in the mince and cook until brown. Then you can add in the tinned tomatoes, puree, dash (or a few leaves) of thyme and salt and pepper to season. Allow this to simmer whilst you boil the potatoes until soft. Add the peas in and mix them in after the sauce has been simmering for about 5 minutes. Drain off the water from the potatoes and return them to the pan and add some butter and milk (or cream as a treat). Mash until perfectly smooth!

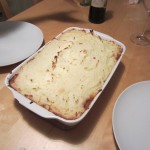
Pour the mince mixture into a large oven proof dish evenly and then top with the mashed potato. Make sure the potato is spread evenly and that it covers all of the sauce. Now put it into the oven and check after around 25 minutes. Keep checking it every few minutes until the mash has just started to go golden brown on the surface.

Remove from the oven and serve up straight away; watch out as it’ll be super hot due to the potato trapping the heat in! You can serve it with some fresh bread on the side if you like or some extra veg but it is perfectly fine being served on it’s own.

Slide 1
Slide 2
Slide 3
Slide 4

10th January – Jamaican chicken with salad and fries

Ingredients below:

• 1 spring onion, minced
• 4 tablespoons orange juice
• 1 tablespoon minced fresh ginger root
• 1 tablespoon minced green chilli
• 1 tablespoon lime juice
• 1 tablespoon soy sauce
• 1 clove garlic, minced
• 1 teaspoon ground allspice
• 1/4 teaspoon ground cinnamon
• 1/2 teaspoon ground cloves
• Chicken breast, thighs or a whole chicken cut up

Mix up all of the marinade ingredients, stir well and mix the chicken in. It’s best to leave this to marinade overnight, or for at least 8 hours if possible, and should be shook/mixed occasionally (I used a food container, but anything like a pyrex dish or similar will work as well).

This would be really nice cooked on a BBQ but seeing as we’re in the first half of January I decided to leave that idea until later in the year. Pre-heat the oven to about 180 degrees C and put in the chicken for around 5 minutes. Take the chicken out and put the fries in (I put some peri-peri chip sprinkle on the fries). Now heat a griddle pan and put the chicken on with a little of the juices; you want to try and char the chicken so keep the pan fairly dry. Keep turning the chicken and adding the sauce until the chicken is cooked, whilst also keeping an eye on the fries.

To serve I simply plated up some salad leaves, topped with the chicken and drizzled the leftover juices over it all. I then plated up the fries into a side bowl and added a little ketchup. Enjoy!

Slide 1
Slide 2
Slide 3
Slide 4

9th January – Apple and cinnamon pork tenderloin with vegetables

Pre-heat the oven to around 180-200 degrees C. Now for the prep; firstly for the apple and cinnamon coating, mix up the following ingredients in a bowl:

• 2 tablespoons cornflour
• 1 teaspoon ground cinnamon
• 2 tablespoons brown sugar
• 2 cooking apples, peeled, cored and grated
• 2 tablespoons dried raisins

Squeeze the grated apples to release the apple juice and bind the whole mixture together. Line a baking tray with tin foil and lay the pork tenderloin in the middle. Coat and surround the pork with the apple and cinnamon mixture and cover with tin foil to make a parcel. Put it into the oven and allow to cook for around 20 minutes before checking, basting with the juices and putting back in for another 20 minutes (extend if necessary until cooked). Please check it every now and then to ensure it doesn’t overcook and go dry. When you put the pork back in after the first 20 minutes you can put your veg on. Today I went for chargrilled carrots and parsnips along with new potatoes (that I’ll shake in butter and herbs before serving).

To serve, simply slice the pork into medallions and cover with the apple and cinnamon mixture then add your chosen veg.

Slide 1
Slide 2
Slide 3
Slide 4
Slide 5

8th January – Jacket potato with bolognese sauce, cheese and salad

Slightly cheating maybe but for tonights tea I just baked a jacket potato, added butter and some of the leftover bolognese sauce from the other night, topped with cheese and served with a side salad. See my bolognese sauce from the 5th January for the recipe.

Slide 1
Slide 2

7th January – Sausages in a red wine and onion sauce with creamy mashed potato

This is another one of my favourite dishes and is worth the extra effort over simply having bangers n mash. Firstly peel the potatoes for the mash and slice them up so that they boil quicker and are easier to mash. Heat a pan up and add a dash of olive oil and then the bangers (I used cumberland ones this time but any are okay). Cook the sausages until browned and then add a couple of medium sized sliced onions and stir for a minute or so, then add a glass of red wine. Add in some salt, pepper and mixed herbs to season. Add the sliced potatoes to a pan of boiling water and cook until soft. Continue stirring the sausages until the onions reduce and the red wine has mostly gone, turning down the heat if necessary. Drain the potatoes off and return to their pan, add in some cream, milk and a couple of knobs of butter and mash until smooth, seasoning to taste with salt and pepper. Serve up the mash and cover with the sausages and then the onion and red wine sauce. Enjoy!

Slide 1
Slide 2
Slide 3
Slide 4

6th January – Oven baked salmon with potatoes, peas and sweetcorn

Tonight I decided to do a simple dish that I have quite regularly, which is oven baked salmon. It’s very quick to prepare, doesn’t need much tending to and tastes delicious! Pre-heat your oven to around 180 degrees C and wash your new potatoes if required. Put your potatoes into a baking tray and add a couple of knobs of butter along with some herbs. To prepare the salmon simply line a baking tray with some aluminium foil and lay the fillets on it. Add olive oil, salt, pepper and herbs over the fillets and wrap them in the foil to make a parcel.

Once the oven has reached temperature put the potatoes in and put the salmon in approximately five minutes later. The salmon should only need around 8-12 minutes if you’re cooking it from fresh; a little longer from frozen. Make sure to shake the potatoes in their tray during cooking to evenly coat them in the butter and herbs. You can serve various vegetables with this dish and this time (as it was a Friday ) was just some sweetcorn and peas that were simply boiled in some lightly salted water. You’ll need to put these on about five minutes after you put the salmon in.

That’s nearly my first week completed! It’s bangers and mash in a red wine and onion reduction on Saturday to round off the week.

Slide 1
Slide 2

5th January – Pasta bolognese

Ingredients

• Beef mince
• Onions
• Shallots
• Clove of garlic
• Salt + pepper
• Herbs de Provence
• Tinned tomatoes
• Tomato paste
• Pasta
• Olive oil

Get a big pan nice and hot and put a dash of olive oil in and wait a few seconds before putting some chopped garlic in. Just before the garlic browns add in the minced beef and stir until the meat is browned off. Add in some chopped onions and shallots and stir for a few minutes. Then add in the tinned tomatoes, tomato paste, herbs and salt n pepper to taste. You can also add some red wine if you like at this stage. Bring to a simmer and keep it there for at least 20 minutes, stirring occasionally.
Whilst the Bolognese is simmering bring a pan of water to the boil and add a little salt. Add the pasta and cook to your preference.

Drain off the pasta and serve straight away with a healthy covering of the Bolognese sauce. Top with cheese and serve with a side salad if you like.

Slide 1
Slide 2
Slide 3

4th January – Homemade pepperoni pizza

This was my first effort at a fully homemade pizza; to be honest it was my first effort at a pizza that was made at home in any sense of the phrase! Well, you’ll never learn unless you try new things! I went off the below recipe for the dough and sauce:

Dough

• 200g self-raising flour
• ¼ teaspoon of salt
• 1 tablespoon of olive oil
• Around 100ml of warm water

Sauce

• One tin of tinned tomatoes
• Dash of sugar
• Nice squeeze of tomato paste
• Some parsley and basil
• Season with salt n pepper

Firstly, fire up the oven to around 220c or gas mark 7 while you prepare the rest of the meal. Next, put all of the ingredients needed for the sauce into a pan on the hob, bring to a boil and simmer. This needs to be reduced to a lovely thick base sauce for the pizza. It should be stirred frequently while you’re making the dough.

Put all the ingredients for the dough into a large mixing bowl and first stir around with a knife (I thought this was odd advice but it does work, with a normal knife!) until the dough starts to come together. Once the dough comes together add a little flour to your hands and knead the dough in the mixing bowl for a few minutes. Once it’s in a nice ball of dough, transfer it to a work surface or chopping board that’s lightly floured; I’d recommend the former as it doesn’t move around! Knead for up to a further 5 minutes until it’s nice and springy and consistent. If it gets sticky then add a little flour, if a little dry, add some water.
By now the sauce should be reducing nicely and be nice and thick with a lovely aroma! Once the sauce is thick enough to be classed as a paste rather than a sauce, then you’re ready to roll out the dough.

Use a lightly floured rolling pin to roll out the dough to your preference of size and thickness. Some people prefer a thick base pizza and others a thin and crispy. For my first attempt (this one) I rolled it out to around 3mm thick and it turned out as a nice compromise between thin n crispy and thick based.

With the base rolled out, transfer it to a pizza tray, pinch the edges to form a lip and add the tomato sauce and spread evenly. Then add some sliced raw onion followed by a healthy coating of grated cheese. After this it’s your pizza; for me I just added pepperoni, but you can add whatever toppings you prefer!

Once you’ve prepared your pizza simply put it into the now baking hot oven for 8-10 minutes depending on the oven. Check it after 5, 8 and 10 minutes and every minute after that until it’s cooked to your liking.

Slice it up and serve straight away!

Slide 1
Slide 2
Slide 3
Slide 4
Slide 5
Slide 6

3rd January – Chicken tagliatelle in a creamy sauce

Heat a pan up and add olive oil, chopped garlic, basil and oregano. Add chicken breasts or thighs and brown off, turning to give an even spread of the oil et al. Chop a few shallots and add to the chicken; a few minutes later add some white wine and reduce until the alcohol has simmered off. Bring a saucepan of lightly salted water to the boil and add in the pasta (follow the cooking directions and cook to your preference). Once the chicken is cooked through, add in some cream and stir to give a consistent finish, reduce the heat and simmer until the pasta is ready, thickening the sauce with cornflour if required. Once the pasta is done, drain off the water and return it to the pan. Then add the sauce from the chicken to the pasta and stir until evenly coated. Serve up the pasta and sauce and place the chicken on top of the bed of pasta. Add parmesan to finish and enjoy with a glass of white!

Slide 1
Slide 2
Slide 3
Slide 4

New addition to the kitchen!

I thought I’d treat myself to a new knife seeing as I potentially have a hell of a lot of chopping to do in the year ahead. After carefully looking around and thinking about what knives I already had I decided to try out a ceramic knife. Rather than buy second best I bought a Kyocera black bladed 14cm santoku style knife. These knives are the best ceramic knives in the world and are all hand sharpened, with diamond cutting wheels as diamonds are the only thing harder than the substance the knives are made of, to ensure perfect blades each time (The quality assessment of the knives is whether they can easily cut through a telephone directory!). I didn’t have much chopping to do for tonights meal, with only shallots and garlic needed to be chopped, but I’ll report back once I’ve done some more testing; perhaps with a video! You get lifetime free re-sharpening, done in Germany, and most people say that even with daily use you’ll only need to think about re-sharpening after 3-5 years! I bought mine from Amazon UK – Click Here

Slide 1
Slide 2